ADK is the second pre-requisite which need to be
installed before start installing System Center Current Branch.
ConfigMgr uses WADK to automate OS deployment and USMT.
We do not have to install all the components of ADK.
For
Config Manager we required only;
- Windows Deployment Tools
- Windows Pre-Installation
Environment (Windows PE)
- Imaging and Configuration Designer (ICD) and
- User
State Migration Tool (USMT).
Download Windows 10 ADK from;
Launch the
adksetup;

Nominate a path where you want to install ADK then click next;

Review the Windows Kits privacy for usage of ADK and data
collection.
Select appropriate option then click next;

Review and accept the license agreement then click next;

Select required features you want to install then click Install;
For a primary site select;
- Deployment tools
- Windows Preinstallation Environment (Windows PE)
- Imaging and configuration designer (ICD) and
- User State Migration Tool (USMT)
The installing feature window will show the progress of the download and installation of ADK.
This process will take some time as it need to download the required files through the internet.

Once the installation is complete, click on close to exit
the installation process.
After installing SQL Server 2012 for site database and
ADK, it is the time to start installing the Config Manager primary site or CAS.
Just a quick reminder, Config manager current Branch
installation must be done using base version which is 1511.
Prerequisites for Primary Site:
Windows Features:
|
·
.NET Framework 3.5:
Including
·
◦.Net Framework 3.5 (Includes .NET 2.0 and 3.0)
◦Non-HTTP Activation
◦HTTP Activation
·
.NET Framework 4.5:
Including
◦ASP.NET
◦HTTP Activation
◦WCF Services
·
Background
Intelligent Transfer Services (BITS):
·
Data Deduplication:
·
Remote Differential
Compression (RDC):
|
Windows Roles:
|
·
Network Device
Enrollment Service
·
Web server (IIS):
Including
o Common HTTP Features >
§ HTTP Redirection
o Application Development >
§ .NET Extensibility
§ ASP.NET
§ ISAPI Extensions
§ ISAPI Filters
o Management Tools >
§ IIS 6 Management Compatibility
§ IIS 6 Metabase Compatibility
§ IIS 6 WMI Compatibility
o Security >
§ Request Filtering
§ Windows Authentication
|
Additional software / Components
|
·
Windows 10 ADK
|
Firewall Exception
|
· None
|
Optional Configuration / Installs
|
·
Download setup prerequisite files
|
Download SC_ConfigMgr_1511 (base version of Current
branch ) from technet evaluation center ( https://www.microsoft.com/en-us/evalcenter/evaluate-system-center-configuration-manager-and-endpoint-protection
)
Launch SC_ConfigMgr_1511.exe as Administrator

The self extractor will open and prompt for unzip folder location
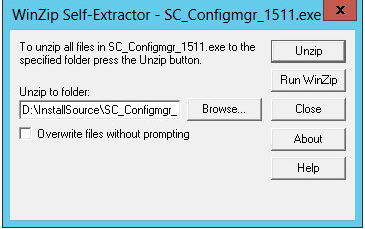
Once the extraction of the installer completed, go to
SC_ConfigMgr_1511\SMSSETUP\BIN\X64 folder then run setupdl.exe

Setupdl.exe will launch Configuration Manager Setup
Downloader and prompt for patch to download the updated installation files.

Click on Download then
it will start the download process.
This will take some time to complete based on your
internet connection speed and resources on the server.
The setup downloader window will close automatically once
the download is complete.


The install will launch System Center Configuration
Manger Setup Wizard, Click Next on Before you Begin window;

On getting started window, Select Install a Configuration
Manager Primary site and DO NOT select Use typical installation options for a
stand-alone primary site.
NOTE: You can select this option if you want to install
on default installation path, MP and DP on the primary server.

Choose your licensing options then click next;

Agree the license terms then click next;

Accept licence terms for;
-
Microsoft SQL Server Express
-
Microsoft SQL Server native Client

On the Prerequisite downloads page, browse to the
location where you have stored the previously downloaded files (if you have
already downloaded earlier).
Otherwise select download required files and browse to
the location where you want to keep them then click Next.
As soon as you click next, the installer will start
downloading the prerequisites.

Again, this download will take some time to complete
based on the download speed and hardware performance.


Select desired Language for Client, by default English will be selected;

Each site code in a hierarchy must be unique and be
comprised of three alpha-numeric digits.
Remember to avoid site names like;
·
AUX
·
CON
·
NUL
·
PRN
·
SMS
Select the installation folder- by default this is set to
C:\program files, but I have decided to install on the D drive;
Select an option to whether you want to install the Configuration Manager Console or not;

Select Primary Site Installation option to whether;
-
Join the primary site to an existing hierarchy
(if you have a CAS already in place)
-
Install the primary site as a stand-alone site
(If this is the first site in the hierarchy)
As this is the first site in hierarchy in my lab so
selected to Install the primary site as a stand-alone site

Click yes when you have prompted “You have selected to install this site stand-alone primary site You can
expand this site into a hierarchy at later time by installing central
administration site. Do you Want to continue?”

On the Database Information page enter the FQDN of the
SQL server;

Note: if we installed unsupported SQL server version the
you will receive below error msg;

NOTE: If you are using remote SQL server then you need to provide the path to the actual SQL server data file and SQL Server log file.
The installer wont allow C$ or D$ in the path for SQL server data file and SQL Server log file.
So go back to the SQL server then browse to the location path where the SQL server data file and SQL Server log file are stored. Then create a share for DATA folder.
Copy the newly created share folder into path to the SQL server data file and path to the SQL Server log file.

Accept the default values for SMS provider settings then
click next;

On client computer communication settings;
-
Select Configure the communication method on
each site system role
o Select
Clients will use HTTPS when they have a valid PKI certificate and HTTPS-enabled
site roles are available

On site system role window, select desired roles you want
to install.
As I want to install management point and distribution
point on different servers, I have deselected both the options;
Click next on the usage data;

On Service Connection Point setup, select Yes if you want
to be prompted for all the latest updates in the console.
If you don’t want to get the updates then select skip this for now then click next;

Review the Settings Summary carefully.
Just a reminder, site code and site name is not
changeable. So make sure that the site code and name is correct.

Resolve any issues on the prerequisites check before
continuing with the setup.
I have received WSUS not installed warning because I
haven’t installed WSUS on this server.
I will be using another standalone server for SUP, so we
can ignore this warning and can proceed by clicking next;

The installation will begin after the prerequisites
check;

The Install will take 30 – 45 min based on the local
resource and connection between primary and remote SQL server.
Once the installation is complete you will be presented
with Core setup has completed confirmation window.
Review all the components and click on View Log button
which will open the setup log file for setup details.

That’s it. We have a functional System Center Current
Branch (1511) primary site installed and up and running.
Click here
for complete SCCM 1511 Current Branch step by step guide, step by step migration
guide, step by step monitoring and health check guide and step by step SCCM
Current Branch servicing guide.
No comments:
Post a Comment